
10 December 2012
Elns' progress
This model does well. The leather parts look good. The robe is nice. Shield color is not good, yet. I will spent next efforts on facial details and hair. Nuff said.

5 December 2012
Capes
Like all oldschool fantasy heroes they are all wearing capes. I don't know why I have chosen green twice. But that's the color I know how to handle due to my Woodelf army.
I used 2 rather opposite techniques for the shading. The bright green cape had already a nice shading after the 1st Layer was applied. So I thinned down a darker green and applied it to the deeper areas. BTW, the same technique was used on the red cape.
The dark green cape was a complete turn over. I did not like the color as seen on a previous blog post. I started dark. Then I added brighter stripes to add highlights. Usually I have trouble with this Pretty ccommon technique. But I am really satisfied with the result. I forgot to check, what I was told how the cape should be colored. It should be ecru colored. I admit, that I have no experience with shading of that color group. The result shows, that it was a good idea to do it in green.
The brown cape is just darkened with black ink/wash. It has still nice highlights but on this photo you cannot see this. You may have noticed the new base fr Girvin. I removed the sprue part and drilled a needle hole in his feet. Then I took a regular pinning needle and glued it into the hole. The needle broke already so he is not such high anymore. But he still jumps higher than before :)

28 November 2012
Girvin's Orange Top
Girvin (right figure) got a orange sweatshirt. The brownish red trousers is nice. But I'll paint the shoes black not brown. I already got the feedback, that the miniature seems to be too bright. I wanted to darken the cloak anyway. However I don't want to paint it black. I consider doing some stripes or checker boards on the trousers to compensate the lack of details on this miniature. I recognized, that the eyes are not really visible.
All parts have only one layer of paint, yet. Next I will do some shading work on the face and on the cloak.

All parts have only one layer of paint, yet. Next I will do some shading work on the face and on the cloak.

24 November 2012
Capes and more
I painted Eln's cape a week ago. Because I primed white I got this lovely shading effect with one single layer of green. For the Half-Elf I wanted a brown cape until I realized, that that cape must get a red lining. So he also got a green cape, but there I have to do much more shading due to the dark color and due to the liquidness of that color. I took again an older color which was going to dry up in the pot. Curses to the producer of cheap color pots. My 15 year old Games Workshop colors are still fine. But my 2 years old Games Workshop colors become (almost all of them) useless.

 As you can see on the picture above, the red lining looks excellent. I made this picture at night. Sorry for that.
I did not paint the lining around the head part, yet. I need a better mood for that more difficult part.
The lady will maybe get a white robe. I just put a base layer "bleached bone" from the really old color range on it. So I can either highlight it more and more to get a white rag. But I can also put some chestnut ink on it to get a brown cloak. I bought a new red ink. Then it will become a red clothing.... No final decisions are done, yet.
The little guy on the left got some jade green on the pauldrons because they will be made of bronze. The axe will show no green when finished, for sure.
23 November 2012
Giving Soul
For me, the moment when you give some paint to the faces, is always like giving the miniature a soul.
 My GW Foundation Flesh Paint was already drought up. I painted only 3 miniatures with it :(
Now I bought the ArmyPainter skin tone. It is pretty dark I think so I have to highlight pretty much of that. Fortunately this are only 4 faces. The gnome should get a dark skin tone anyway.
This is all just the first layer. I had the green and purple just opened when I added the little pieces of color. Korgan's chest is not painted in flesh, it is a brown layer. Also Eln's leather pieces got a first brown layer.
One week later I put this black layer on all parts which should be covered with metal paint later. Also Korgan's hair is black now, so that I can drybrush it to dark-gray.
 PS: hab vorhin erst nen Kommentar gesehen und frei geschaltet. Bitte nachschauen.
PSS: Fun fact: Korgan hat Falten in der Stirn. Die waren im Modell schon drin, jedoch so schwach, dass ich sicher war, dass die nachdem Farbe draufhatte kommt, nicht mehr zu sehen sind. Ich hab die vor dem Grundieren tiefer reingeschnitten mit nem Modellierwerkzeug. Das hat sich gelohnt! Das wir klasse!

Now I bought the ArmyPainter skin tone. It is pretty dark I think so I have to highlight pretty much of that. Fortunately this are only 4 faces. The gnome should get a dark skin tone anyway.
This is all just the first layer. I had the green and purple just opened when I added the little pieces of color. Korgan's chest is not painted in flesh, it is a brown layer. Also Eln's leather pieces got a first brown layer.
One week later I put this black layer on all parts which should be covered with metal paint later. Also Korgan's hair is black now, so that I can drybrush it to dark-gray.

PSS: Fun fact: Korgan hat Falten in der Stirn. Die waren im Modell schon drin, jedoch so schwach, dass ich sicher war, dass die nachdem Farbe draufhatte kommt, nicht mehr zu sehen sind. Ich hab die vor dem Grundieren tiefer reingeschnitten mit nem Modellierwerkzeug. Das hat sich gelohnt! Das wir klasse!
22 November 2012
Intermission
The RoboRally Roboters are cute but simple models and well suited to get back into miniature painting. Here are some WiP pictures. The goal was to get some fair colors rather than a fine paint job. I decided to try out the Army Painter Quick shade. I dipped the Robos. I think the splash on technique is better suited for me.


 Oh, there is sneak peak of the party, too ;)


Primed
I primed the minis a few weeks ago. Together with some board game minis. The crowd on the right is from Talisman. Also the player chars from Zombieeees will get some paint. In the front there are some Robo Rally Roboter which also belong to a friend.

21 October 2012
Nose corrections

Pinning
I pinnend Korgan's arm/hand, i.e. I drilled a hole and added a wire pin. This will increase stability.
 I have only a 1.0mm drill here. The wire is 0.8mm so I had to fill some green stuff.
New drills are ordered at amazon.de :)

New drills are ordered at amazon.de :)
16 October 2012
Korgan and the fur pants
So Farbe I spent more Time blogging than actual work. Today I gathered my first XP with proCreate. That is the grey putty. I added a metal ring to the beard. Then I experimented with an alternative cod piece. Fur pants don't look really good so I removed the putty again.


15 October 2012
Korgan's Base Model and Beard extensions
Darksword miniatures again. The model comes with two weapon choices. The greens can be seen here. The model came with almost no visible mold lines. So I started with the beard extension. Not much to say. I am pretty happy with the result.
Tools:
 And result

 I used GW Green Stuff. I am not sure whether I will really try adding a ring to the beard. Bad picture :(
I am not sure what to do with the testicles protection. It looks a bit odd.
Tools:


I am not sure what to do with the testicles protection. It looks a bit odd.
14 October 2012
Atoms Feed
Hey all,
I just recognized, that the feed for this blog does not work well. I actually wanted to have just a short abstract in the feed. But there is no "Read Full article" link.... I think I switch to head line only. Good feed readers have setting to load the site per default. I use Mr Reader and it has such a setting.
Stay tuned
Thaldor's Base Model
It is impossible to find a miniature with spear AND bow and arrows. So I prepared myself to do a conversion. Thaldor's base model has a spear and I have to add a bow and arrows somehow. I'll discuss this conversion a few times more in the future :)
The male adventurer model is also a Darksword Miniature. Under the hood you do not see his ears, so there is no need for sharpening the ears. He already works as Half-Elf This model was actually the alternative choice. I had chosen a much cooler Fenryll miniature but after the first (and only) feedback round I was told that the Darksword miniature. Also the spear blade is too big. That was also my thinking.
So the first step as always was cleaning the mold lines. Second, I slightly filed the massive metal base in shape. The base is as big as the old Hero Quest figures. That may become an issue when the players use 3D Terrain. The next step was cutting the spear head and replace it with a more classic one. I have a lot of spare spear heads from the GW Soldiers of the Empire box. I took one, cut it in shape, removed the quast and drilled a hole into it. You can see this on the picture. (sorry, I did not crop the pic)
 Here you can see how we'll it fits.
 However in the meantime the barrel-shaped part of the spear (between hand and spear blade) broke away. That is because the spear arrived bended when bought it. Moving this fine parts back and forth let them break.
Bob Ross would say, that this was a little happy accident. It broke before painting and now the spear is shorter. Maybe I take another spear head and keep it a bit longer. I made no decision on this, yet.
Now the next big issue is the bow. I have bows and quivers bits left from Games Workshop, Perry Miniatures and Zvezda. So I have a really large list of choices there. But with the casted cape it is hard to attach that to the belt or as backpack. The plan is, that I attach a quiver which is cut into halves to the belt. This way it should look like the Fenryll Ranger's quiver. I bought some ProCreate. I try to change the cape sculpt from the back so that it looks like there is a quiver and a bow hidden under the cape.
Plan B is that I place a backpack onto the ground with the alternative weapon choice. Plan C is, not to add the bow.
And if you read this J.
I know now that it is for you. Your choice really meant that I take the less detailed miniature. Also the conversion is much more complicated. So now I really have to scratch my head. Just 4 Fun und um dich zu ärgern ziehe ich den Plan mit dem Fenryll Ranger durch ;P
My original plan was to use the Fenryll Ranger on the right of the product page (link above) and replace the free and open hand with a hand holding a spear. I was thinking of a Warhammer Glade Rider spear or something from Perry Twin's War of Roses range.
The male adventurer model is also a Darksword Miniature. Under the hood you do not see his ears, so there is no need for sharpening the ears. He already works as Half-Elf This model was actually the alternative choice. I had chosen a much cooler Fenryll miniature but after the first (and only) feedback round I was told that the Darksword miniature. Also the spear blade is too big. That was also my thinking.
So the first step as always was cleaning the mold lines. Second, I slightly filed the massive metal base in shape. The base is as big as the old Hero Quest figures. That may become an issue when the players use 3D Terrain. The next step was cutting the spear head and replace it with a more classic one. I have a lot of spare spear heads from the GW Soldiers of the Empire box. I took one, cut it in shape, removed the quast and drilled a hole into it. You can see this on the picture. (sorry, I did not crop the pic)


Bob Ross would say, that this was a little happy accident. It broke before painting and now the spear is shorter. Maybe I take another spear head and keep it a bit longer. I made no decision on this, yet.
Now the next big issue is the bow. I have bows and quivers bits left from Games Workshop, Perry Miniatures and Zvezda. So I have a really large list of choices there. But with the casted cape it is hard to attach that to the belt or as backpack. The plan is, that I attach a quiver which is cut into halves to the belt. This way it should look like the Fenryll Ranger's quiver. I bought some ProCreate. I try to change the cape sculpt from the back so that it looks like there is a quiver and a bow hidden under the cape.
Plan B is that I place a backpack onto the ground with the alternative weapon choice. Plan C is, not to add the bow.
And if you read this J.
I know now that it is for you. Your choice really meant that I take the less detailed miniature. Also the conversion is much more complicated. So now I really have to scratch my head. Just 4 Fun und um dich zu ärgern ziehe ich den Plan mit dem Fenryll Ranger durch ;P
My original plan was to use the Fenryll Ranger on the right of the product page (link above) and replace the free and open hand with a hand holding a spear. I was thinking of a Warhammer Glade Rider spear or something from Perry Twin's War of Roses range.
13 October 2012
Elns' Base Model
I had trouble finding a suitable female miniature. Now I mix two models which means some work. Both are Darksword miniatures. Many miniatures are either half-nude and Red Sonja style or wearing Anime style armour. So I use the sword arm of Lady Elmore which provides some leather pieces. I will attach it to Lady Easley. Both models are great. I was not aware of that miniature line before. I love the classic look.
 The cleric wields a fine mace. While the left arm was manufactured as separate part the right arm was attached to the miniature. So my first step after removing the mold lines was cutting of the arm. That worked pretty well but took some time. Now it looks like this.


11 October 2012
Girvin's Base Model(s)

The work can start
After a feedback round I now have the base models. Time to start conversions ;) I also sorted my paint station
From right to left there is a hasslefree Barbarian in He-Man style. Next the is Duglum, a daemonic creature from "The black eye" RPG which causes diarrhea. Then some partially painted 4th edition Games Workshop Woodelves. On the left there are our DnD Heroes.
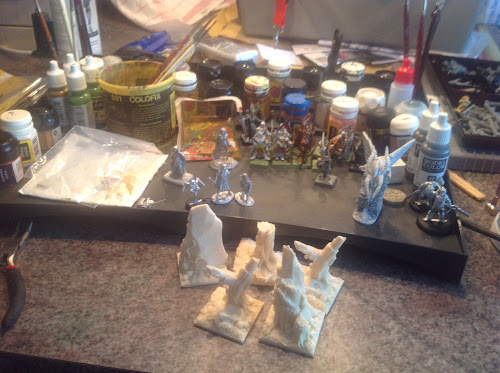 Behind the lines you see various color pots from GW and Vallejo. You may notice that I have a lot old colors. But these >10yo colors are still great. A lot of my 5yo colors are already drought up. These Vallejo and Foundation paints are maybe 1-2 years old.
From right to left there is a hasslefree Barbarian in He-Man style. Next the is Duglum, a daemonic creature from "The black eye" RPG which causes diarrhea. Then some partially painted 4th edition Games Workshop Woodelves. On the left there are our DnD Heroes.

Characters Guide posted
I just added a character guide as static page here. That was all description I got. I am actually happy having such a big freedom.
10 October 2012
One Note on privacy
I host this blog on blogger which owns google. I use google Analytics for this blog, too. Please be aware, that google will be able to track your visit here really well. Also I can get a lot of information about that.
Thanks
Thanks
Preparation
I didn't spent a lot of time this year for this hobby. However when a friend came up and told me that he started playing with a new group playing Dungeons and Dragons and he is looking for some hero miniatures I told him that the available prepainted stuff sucks. He should ask someone who is doing table top war games like WH or LotR as I do. So I offered him to do help him, buying a miniature. Later I offered him to create his hero. When he asked me to do all 4 heros I accepted to do so. He knew my painting skill from pictures and now I hope he will not be disappointed from my work when he sees the miniatures in real.
So, before I introduce the characters I show you this picture
 I took my GW paint station of the shelf. Over the time it was completely cluttered. This is how this project starts: chaotic ;)
So, before I introduce the characters I show you this picture

Subscribe to:
Posts (Atom)